Category: ESP32 Dev Boards

  • ESP32 MicroPython vs Arduino C++: Which Should Beginners Learn?

    Once you have an ESP32, the next decision is the language: the familiar Arduino C++ core, or MicroPython. Both run on the exact same hardware, so this is about learning curve and fit, not capability. Here is the comparison.

    Ease of learning

    MicroPython reads like standard Python – no curly braces, no compile step, and you can type a line at a serial prompt and see it run. That instant feedback is great for learning. Our ESP32 vs Arduino beginner guide assumes the C++ route; MicroPython is the friendlier alternative if you already know Python.

    Libraries and ecosystem

    The Arduino core has the deepest library pool, including the PubSubClient MQTT library used in our IoT tutorial. MicroPython ships a clean standard library and strong networking modules, but you occasionally wrap a C library for cutting-edge features. For most projects both have what you need.

    Performance and control

    C++ compiles to native code, so it is faster and gives finer control of timers, interrupts and memory. MicroPython is fast enough for the vast majority of hobby and prototype work, but tight real-time loops favour C++. Pick C++ when every microsecond counts.

    When to choose which

    • Start with MicroPython if you know Python, want quick experiments, or are teaching.
    • Start with Arduino C++ if you need maximum performance, low-level peripherals, or a specific existing library.

    Either way, the board fundamentals are the same – compare chips in our ESP32 vs ESP8266 guide, and when you are ready, the home automation starter works in both languages.

    Frequently asked questions

    Is MicroPython easier than C++ for the ESP32?

    For most beginners, yes. MicroPython reads like Python, needs no compile step, and lets you test lines interactively over a serial prompt. C++ is faster and closer to the hardware, but has a steeper entry.

    Can the ESP32 run both MicroPython and Arduino?

    Yes – they are just different firmware images. You flash MicroPython to use Python, or use the Arduino core to write C++. You can reflash the board to switch; the hardware is identical either way.

    Should a beginner start with MicroPython or Arduino on ESP32?

    If you already know Python or want the gentlest start, begin with MicroPython. If you aim at performance, low-level peripherals, or existing C++ libraries, start with the Arduino core. Both are valid first steps.
  • ESP32 Home Automation Starter: Build Your First Smart Sensor

    The ESP32 is the cheapest way to put real automation in your home without a hub tax. This ESP32 home automation starter takes you from a bare board to a sensor you can see and act on – no Raspberry Pi required.

    What you need

    • An ESP32 board (the ESP32-S3 with a 4.3-inch IPS display is great for showing live values)
    • A simple sensor – DHT22 (temperature/humidity) or a PIR motion sensor
    • The Arduino ESP32 package (or MicroPython) and the sensor library
    • An MQTT broker (local Mosquitto or a free cloud broker)

    If you are choosing the chip itself, our ESP32 vs ESP8266 and ESP32 vs Raspberry Pi guides frame where it fits. Language choice is covered in the MicroPython vs Arduino comparison.

    Step 1 – Gather the board and sensor

    Start small: one ESP32 and one sensor. A temperature/humidity sensor gives an instantly useful reading; a PIR teaches event detection. Both are beginner safe.

    Step 2 – Set up the toolchain

    Install the ESP32 board package in the Arduino IDE (or flash MicroPython). Flash a blink sketch first so you know the upload path works before adding complexity.

    Step 3 – Wire and read the sensor

    Connect the sensor to a GPIO, read a value in code, and print it to the serial monitor. Confirm the hardware works locally before touching the network – it isolates bugs to one layer at a time.

    Step 4 – Connect Wi-Fi and MQTT

    Add your Wi-Fi credentials and point the board at a broker, then publish on a topic like home/livingroom/temp. The messaging half is detailed in our ESP32 MQTT tutorial, and a camera variant is in the ESP32-CAM streaming project.

    Step 5 – Visualise and automate

    Subscribe from a dashboard or Home Assistant to plot the value, then add a rule – alert on motion, or notify on high temperature. That rule is the moment it becomes automation rather than just a sensor.

    Frequently asked questions

    Can the ESP32 control smart home devices?

    Yes. Over Wi-Fi it can publish sensor data, switch relays, and talk to platforms like Home Assistant via MQTT or REST. It is the backbone of most low-cost DIY automation because it is small, cheap and wireless.

    Do I need Home Assistant for ESP32 home automation?

    No. You can run a simple MQTT broker and a basic dashboard, or push readings to a cloud service. Home Assistant just makes orchestration and UI much easier once you have several devices.

    Is ESP32 home automation beginner friendly?

    Yes. A first sensor-to-dashboard project is achievable in an afternoon if you follow a step-by-step path: wire a sensor, connect Wi-Fi, publish over MQTT, then visualise. Our MQTT tutorial covers the messaging half.

  • ESP32 vs ESP8266: Which Wi-Fi Board Should You Start With?

    If the “ESP32 vs Arduino” debate is the first fork, the ESP32 vs ESP8266 question is the second. Both are Espressif Wi-Fi chips you program from the Arduino IDE, but they are aimed at different budgets and ambitions. Here is how to choose.

    Cores and speed

    The ESP8266 is a single-core chip that is perfectly capable for basic Wi-Fi tasks. The ESP32 is dual-core, faster, and has far more RAM and flash, which matters the moment you parse JSON, run a web server, or handle TLS. Start with our ESP32 vs Arduino guide if you are new to the ecosystem.

    Wireless: Bluetooth is the decider

    The ESP8266 does Wi-Fi only. The ESP32 adds Bluetooth Classic and BLE, which unlocks peripherals, beacons and phone-free sensing. If your project might ever need a Bluetooth sensor or a phone connection without Wi-Fi, the ESP32 wins by default.

    GPIO and peripherals

    The ESP32 exposes more pins and extras like touch sensors, a DAC, and extra UART/SPI/I2C interfaces. The ESP8266 has fewer usable pins and some quirks (notably a limited ADC). For anything beyond a single relay or sensor, the ESP32 is roomier – see the ESP32 dev board buying guide for board choices.

    Price and maturity

    The ESP8266 is famously cheap and battle-tested for simple jobs. The ESP32 costs only a little more and is now equally mainstream. Unless you are buying in volume for a trivial task, the small premium for the ESP32 pays off. Boards like the ESP32-S3 with a 4.3-inch IPS screen show how far the platform has come.

    Our recommendation

    Buy an ESP32 for your first and future projects; keep the ESP8266 only for the absolute cheapest Wi-Fi switch. If you want to go further, our MicroPython vs Arduino on ESP32 guide helps you pick a language, and the home automation starter turns the board into something useful immediately.

    Frequently asked questions

    Is the ESP32 better than the ESP8266?

    For most new projects, yes. The ESP32 adds a faster dual-core chip, Bluetooth, more GPIO, more memory and peripherals like touch and DACs, usually at a similar entry price. The ESP8266 remains fine for simple Wi-Fi-on/off tasks.

    Is the ESP8266 still worth buying?

    Yes for the cheapest possible Wi-Fi relay or sensor where you do not need Bluetooth or many pins. It is mature, cheap and well documented. But if you are buying your first board today, the ESP32 is the better long-term choice.

    Which is easier to learn, ESP32 or ESP8266?

    They share the same Arduino toolchain, so the learning curve is nearly identical. The ESP32 simply exposes more features; you only explore them when you need them, so beginners are not overwhelmed.

  • ESP32 vs Raspberry Pi: Which Board Should You Use in 2026?

    The “ESP32 vs Raspberry Pi” question is really “microcontroller vs single-board computer.” They are not rivals so much as tools for different jobs. This guide helps you pick.

    What each one is

    The ESP32 is a microcontroller: tiny, cheap, wakes from sleep in milliseconds, and sips power while running Wi-Fi and Bluetooth. The Raspberry Pi is a single-board computer running Linux, with a desktop, multiple cores, USB, and HDMI. Start from our ESP32 buying guide.

    Power and always-on

    This is the ESP32’s home turf. A battery sensor node can run for months or years on an ESP32 in deep sleep. A Raspberry Pi draws watts continuously and needs a proper power supply – fine on a desk, poor on a remote sensor. For IoT, the ESP32 is usually the right call; see our ESP32 vs Arduino comparison too.

    When you need a Raspberry Pi instead

    Choose a Pi when the project needs a full OS: a kiosk, a home server, Python with heavy libraries, a camera with real processing, or anything with a browser. The Pi’s compute and I/O blow past what a microcontroller can do.

    Cost and ecosystem

    ESP32 boards are a few dollars and pair with the familiar Arduino toolchain; the ESP32-S3 with a display even adds a screen. A Raspberry Pi costs more and needs storage and peripherals, but gives you a complete computer. For most connected gadgets, the ESP32 wins on price and power; for computing, the Pi wins on capability.

    Frequently asked questions

    ESP32 vs Raspberry Pi: which should I use?

    Use an ESP32 for small, always-on, battery-friendly sensing and control with Wi-Fi/Bluetooth. Use a Raspberry Pi when you need a full Linux system, a desktop, cameras, or heavier compute.

    Can the ESP32 replace a Raspberry Pi?

    For sensor nodes, relays, and simple web services, yes – and it uses a fraction of the power. It cannot replace a Pi for running a full OS, browser, or computer-vision pipelines.

    Is the ESP32 easier to learn than Raspberry Pi?

    Different learning curves. The ESP32 is programmed like an Arduino (C/C++), which is approachable. A Raspberry Pi adds Linux, which is more to learn but more capable.

    Related guides

  • ESP32-CAM Video Streaming: Build a Wi-Fi Camera in an Afternoon

    The ESP32-CAM is the cheapest way to put a live camera on your network. This ESP32-CAM video streaming project takes you from parts to a browser feed in an afternoon – no Raspberry Pi required.

    What you need

    • An ESP32-CAM module (ESP32 + OV2640 camera + microSD slot)
    • A USB-to-serial adapter (FTDI or CP2102) to flash it
    • A 5V supply with enough current for the camera (a weak source causes resets)
    • The Arduino IDE with the ESP32 board package

    This build pairs well with the wireless fundamentals in our ESP32 buying guide and the MQTT tutorial if you later want to push frames or detections to the cloud.

    Step 1 – Gather the hardware

    The ESP32-CAM has no native USB, so you flash it through a serial adapter. Wire TX/RX crosswise (adapter TX to board RX, and vice versa), connect GND, and bridge GPIO0 to GND only while uploading.

    Step 2 – Flash CameraWebServer

    Open the example, select “AI Thinker ESP32-CAM” as the board, and upload. After success, remove the GPIO0 bridge and reset the board. The serial monitor prints the IP it receives from your Wi-Fi.

    Step 3 – Set Wi-Fi and stream

    Put your SSID and password in the sketch, reboot, then open http://<board-ip> in a browser on the same network and click Start Stream. You now have a working Wi-Fi camera. For a board with a screen to show status, see the ESP32-S3 4.3-inch IPS review.

    Tips and limits

    Expect 5-15 fps at low resolution – fine for seeing motion, not for recording. Use a stable 5V supply, keep the antenna clear, and lower resolution if the stream stutters. Browse more ESP32 project guides.

    Frequently asked questions

    Can the ESP32-CAM stream video over Wi-Fi?

    Yes. The standard example serves an MJPEG stream you view in any browser on the same network. It is low resolution and frame rate, but perfect for a door, pet, or plant cam.

    What frame rate does the ESP32-CAM deliver?

    Typically 5-15 fps at lower resolutions like 640×480, and less at higher settings. It is enough to see motion, not for smooth video recording.

    Do I need a special board for ESP32-CAM?

    You need an ESP32-CAM module (ESP32 with a camera and a microSD slot). It usually needs a separate USB-to-serial adapter to flash, and a 5V supply with enough current for the camera.

    Related guides

  • ESP32 vs Arduino: Which Should a Beginner Choose in 2026?

    If you are starting in electronics or IoT, the “ESP32 vs Arduino” debate is the first fork in the road. Both are excellent, both are programmed from the Arduino IDE, and both have huge communities. The difference is what each is built for.

    ESP32 vs Arduino: quick comparison

    An Arduino Uno is a simple 8-bit microcontroller great for learning the basics. The ESP32 is a 32-bit, dual-core chip with Wi-Fi and Bluetooth baked in. For any project that touches the network – a sensor that reports to the cloud, a smart-home gadget, a remote display – the ESP32 removes the need for extra modules.

    Processing and memory

    The ESP32 runs at hundreds of MHz with far more RAM and flash than an Uno. That headroom matters when you parse JSON, drive a display, or run a web server on the board itself. An Arduino Uno struggles once you leave blinking-LED territory.

    Wireless: the ESP32’s killer feature

    Wi-Fi and Bluetooth are native on the ESP32. Want to publish a temperature reading to a dashboard? That is a few lines of code. On an Arduino Uno you would buy a separate shield, wire it up, and still fight for memory. This is why the ESP32 dominates modern dev-board projects.

    GPIO and peripherals

    Both expose plenty of pins, but the ESP32 adds peripherals like touch sensors, a DAC, and more UART/SPI/I2C interfaces. The trade-off is that some ESP32 pins have boot-time constraints – a small learning curve that the community documents well.

    Ecosystem and learning curve

    Arduino wins on sheer gentleness for absolute first-timers: fewer surprises, more tutorials aimed at kids and classrooms. The ESP32 is barely harder and pays you back with capability. If your end goal involves connectivity, start on the ESP32 and you will not outgrow it.

    Our recommendation

    Buy an ESP32-S3 board with USB-C and a display if you want to build things that talk to the internet. Keep an Arduino Uno around only if you are teaching the very basics or maintaining old sketches. See our ESP32-S3 4.3-inch IPS board review for a board that pairs wireless with a screen out of the box.

    Frequently asked questions

    Is ESP32 harder to learn than Arduino?

    Slightly. You program the ESP32 from the same Arduino IDE, but it is a faster dual-core chip with Wi-Fi and Bluetooth, so there is more to explore. Most beginners are productive within a weekend.

    Can the ESP32 replace an Arduino?

    For the large majority of hobby projects, yes. It has more GPIO, more memory and wireless built in, usually at a similar or lower price than an Arduino Uno plus a separate Wi-Fi shield.

    Which ESP32 board should a beginner buy?

    An ESP32-DevKitC or an ESP32-S3 board with a USB-C port and a built-in or on-board antenna is the easiest start. The S3 also adds more GPIO and is well supported by the Arduino core.

    Related guides

  • ESP32 MQTT Tutorial: Send Your First Sensor Reading to the Cloud

    MQTT is the lightweight publish/subscribe protocol that powers most DIY IoT. This ESP32 MQTT tutorial takes you from a blank sketch to a board that publishes a sensor reading and listens for commands – using the Arduino IDE and the popular PubSubClient library.

    What you need

    • An ESP32 board (an ESP32-S3 with a display works great and shows live values)
    • Arduino IDE with the ESP32 board package installed
    • The PubSubClient library
    • An MQTT broker (local Eclipse Mosquitto, or a free cloud broker)

    Step 1 – Install the libraries

    Open Library Manager and install PubSubClient by Nick O’Leary. Confirm your ESP32 board appears under Tools > Board. This single dependency handles the MQTT handshake for you.

    Step 2 – Connect to Wi-Fi

    Set your credentials and call WiFi.begin(ssid, password). Wait for WL_CONNECTED before doing anything network-related – a common beginner bug is publishing before Wi-Fi is up.

    Step 3 – Configure the broker

    Create a WiFiClient and a PubSubClient, then client.setServer(broker_host, 1883). Give each device a unique client ID so the broker can tell them apart.

    Step 4 – Publish a reading

    In loop(), read a sensor and call client.publish("sensors/temp", payload). Keep the payload small – a number or a short JSON string is ideal. Remember to call client.loop() often so the client services incoming traffic and keeps the connection alive.

    Step 5 – Subscribe to commands

    Call client.subscribe("device/cmd") and implement the callback. When a message arrives you can flip a GPIO, change a mode, or reply on another topic. This two-way link is what turns a sensor into a controllable device.

    Troubleshooting

    If the connection drops, make your loop non-blocking and add a short-delayed reconnect instead of resetting the chip. For secure deployments use WiFiClientSecure on port 8883. Boards with more RAM, like the ESP32-S3 family, handle TLS comfortably.

    For more board choices, see our ESP32 dev board guides.

    Frequently asked questions

    Which MQTT broker works with the ESP32?

    Any standard broker works: Eclipse Mosquitto, HiveMQ, EMQX, or a free cloud broker. The ESP32 just needs the broker host, port and (optionally) credentials. Port 1883 is plain MQTT; 8883 is MQTT over TLS.

    Can the ESP32 do MQTT over TLS?

    Yes. Use WiFiClientSecure instead of WiFiClient and provide the broker certificate (or skip verification for testing). TLS adds memory cost, so a board with more RAM like the ESP32-S3 is comfortable.

    Why does my ESP32 MQTT connection keep dropping?

    Usually a blocking loop or a watchdog reset. Keep your loop non-blocking, call client.loop() frequently, and implement a reconnect with a short delay rather than a hard reset.

    Related guides

  • ESP32-S3 4.3-inch IPS Dev Board: Review & Project Guide (2026)

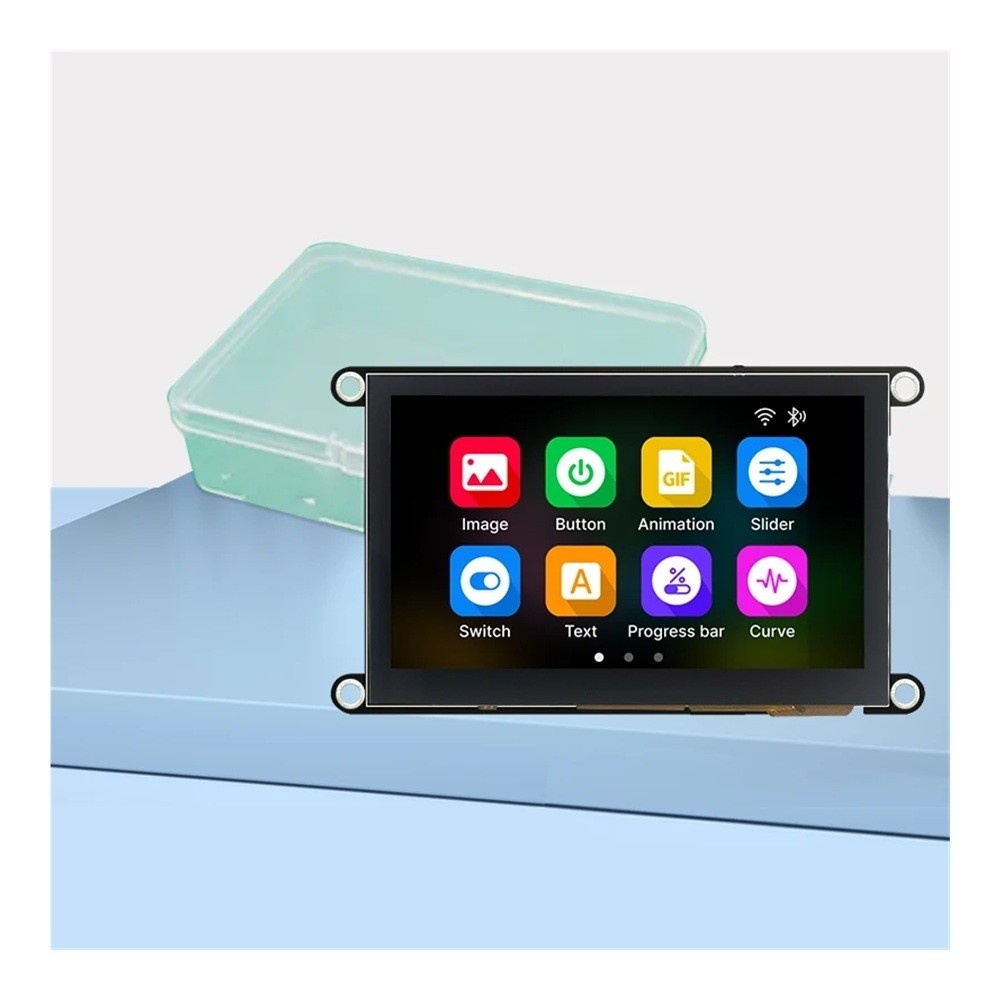
    The ESP32-S3 development board with a 4.3-inch IPS display is a powerful single-board platform for hobbyists and engineers who need a screen, wireless connectivity, and serious compute in one compact package. It pairs an ESP32-S3 chip with a large touch-capable display, making it ideal for dashboards, smart-home control panels, and interactive IoT devices.

    We build and sell this board at MadeInCN Shop, so this guide explains the hardware, what it can do, and how to get started with Arduino, MicroPython, or ESP-IDF.

    ESP32-S3 development board with 4.3-inch IPS display

    ESP32-S3 Board with 4.3-inch IPS Display
    价格范围:.99 至 .99

    View product →

    What’s on the Board

    Based on the product specifications, the board is built around the ESP32-S3 microcontroller, a dual-core Xtensa LX7 chip with Wi-Fi and Bluetooth connectivity. It ships with a 4.3-inch IPS display at 480×272 resolution, and is equipped with 8 MB PSRAM and 4 MB flash, giving you ample memory for rich UIs and complex projects. An integrated IPEX antenna provides for external antenna options when you need better range.

    Spec Detail
    MCU ESP32-S3 (dual-core Xtensa LX7)
    Display 4.3-inch IPS, 480×272 resolution
    PSRAM 8 MB
    Flash 4 MB
    Connectivity Wi-Fi (2.4 GHz) and Bluetooth / BLE
    Antenna On-board IPEX connector for an external antenna
    Programming Arduino, MicroPython, ESP-IDF

    What You Can Build

    The combination of a large display, Wi-Fi, and plenty of memory opens up a wide range of projects:

    • IoT dashboards and home automation control panels that show sensor data and device states.
    • Smart displays for weather, calendars, or media playback controls.
    • Retro gaming and handheld consoles thanks to the 480×272 screen and ample RAM.
    • Interactive prototypes and HMI (human-machine interface) panels for products and kiosks.
    • Networked sensors and data loggers that push readings to a server or cloud.

    Which Framework Should You Use?

    • Arduino is the fastest way to get started, with the largest library ecosystem and the most tutorials.
    • MicroPython is ideal if you prefer a Python workflow and rapid iteration, though it consumes more of the device’s memory.
    • ESP-IDF (Espressif’s native framework) gives the most control, performance, and access to low-level features, and is best for production or advanced projects.

    Pros and Cons

    Pros

    • Large, bright IPS display makes rich user interfaces easy.
    • 8 MB PSRAM and 4 MB flash support complex, memory-hungry applications.
    • Built-in Wi-Fi and Bluetooth for easy connectivity.
    • Fully supported by Arduino, MicroPython, and ESP-IDF.

    Cons

    • The large display draws more power, so battery-powered projects need power management.
    • More complex than a bare ESP32 module, so it suits projects that genuinely need a screen.
    • Touch and display libraries may require additional wiring or calibration depending on the exact panel.

    Getting Started Tips

    • Start with a known-good display or touch driver library that matches your panel to save time.
    • Use an appropriate external antenna via the IPEX connector if you place the board in an enclosure.
    • Power the board from a stable 5 V supply, especially when drawing current for the display.
    • Keep your ESP-IDF or Arduino core up to date for the best Wi-Fi stability on the ESP32-S3.

    FAQ

    Can I program the ESP32-S3 board with Arduino IDE?

    Yes. The ESP32-S3 is fully supported by the Arduino IDE via the Espressif board package, and the board works with display libraries in the Arduino ecosystem.

    Does the board support MicroPython?

    Yes. You can flash a MicroPython firmware for the ESP32-S3 and run Python scripts, although memory-is-hungry UIs should be optimised.

    Can I use an external antenna?

    Yes. The board includes an IPEX connector, so you can attach an external antenna to improve Wi-Fi range when the board is housed in metal or a thick enclosure.

    Is the ESP32-S3 good for WiFi projects?

    Yes. The ESP32-S3 has integrated 2.4 GHz Wi-Fi and Bluetooth, making it well suited to IoT devices that need to connect to a network or cloud.

    Verdict

    The ESP32-S3 board with a 4.3-inch IPS display is a versatile and capable platform for anyone who wants to build a screen-plus-connectivity device. With strong Arduino, MicroPython, and ESP-IDF support and generous memory, it is a great choice for dashboards, smart displays, and interactive IoT projects.

    Ready to build? Get the board and start your project at MadeInCN Shop.

    Related guides

  • ESP32 Development Board Buying Guide (2026)

    Choosing the right ESP32 development board can save you weeks of prototyping time. This guide covers the specs that actually matter.

    ESP32-S3 development board with 4.3-inch IPS display

    ESP32-S3 Board with 4.3-inch IPS Display
    价格范围:.99 至 .99

    View product →

    1. MCU & Wireless

    Most boards use the ESP32-S3 with Wi-Fi and Bluetooth. Confirm the chip revision and whether you need Bluetooth LE for your project.

    2. PSRAM & Flash

    For display-heavy or AI workloads, 8MB PSRAM and 4MB Flash is a sweet spot. Our ESP32-S3 4.3″ IPS dev board ships with exactly that.

    3. Display & Antenna

    A built-in IPS panel with IPEX antenna support simplifies enclosures. Browse the full dev board collection for more options.

    We source genuine international-version boards and ship worldwide with tracked delivery.

    Related guides

Refer a friend — you both get US$5.0
MadeInCN Shop (长沙市熙麟电子商务有限公司)  ·  Est. 2022  ·  Reg. No. 91430104MABNHQAG6N  ·  岳麓区银盆岭街道岳麓大道89号香江国际1栋1412  ·  WhatsApp +86 16673109418  ·  madeincnshop@126.com  ·  Customer support: replies within 12h
MadeInCN is an independent reseller. HUAWEI and all other product names, logos and brands are the property of their respective owners and are used solely to describe the products offered.